
STILLWATER FIELD GUIDE
HUSH equipment and inventory: build a usable kit
A good kit is one you can operate and afford to lose. Here are the inventory controls, starter purchase and prepare–loot–stash workflow visible in the reviewed gameplay.
Know the space you actually have
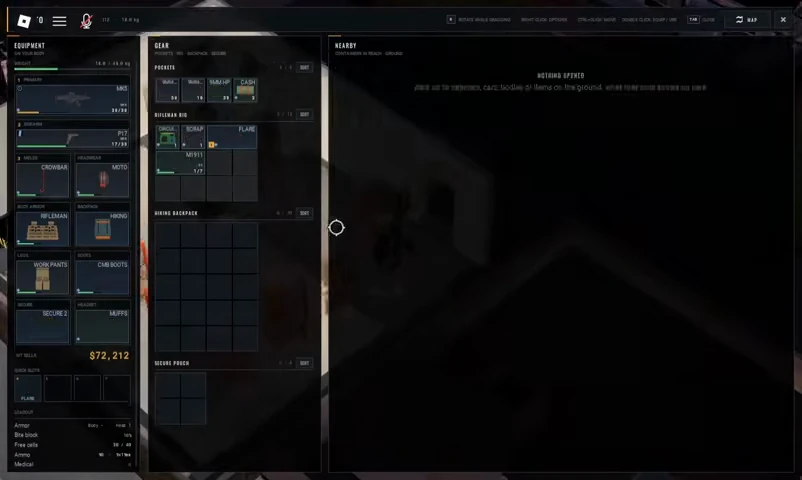
In one reviewed setup, Rifleman Rig has a 4 × 3 grid and Hiking Backpack has 4 × 5. The visible Secure Pouch has 3 × 3. Check the grid on the particular item you equip.
| Observed container | Grid | Cells |
|---|---|---|
| Rifleman Rig | 4 × 3 | 12 |
| Hiking Backpack | 4 × 5 | 20 |
| Secure Pouch in the reviewed setup | 3 × 3 | 9 |
Buying and equipping are separate actions
- In the lobby, open Character and find the purchased item in your stash.
- Drag a backpack into the Bag equipment slot and a rig into its correct slot.
- Move your weapon, compatible ammunition and medical items into the kit you will carry.
- Check the equipped slots and available grid before deploying. If the client says “It can’t go inside itself,” move the container to the equipment slot instead of into its own storage.
One starter option visible at Gunner
An October 15 Gunner level 4 screen lists a $6,500 Starter Kit containing a P17 Pistol, 9 × 19 mm FMJ ammunition and a Bayonet. Limited stock and restock timers are visible, so read the current offer before spending.
The ammunition panel has caliber filters and separate per-hit values for different weapons. Match the box to the weapon’s actual caliber and compatibility. A number shown for one weapon is not a universal damage value.
A source-bound equipment run
In the October 15 equipment run, the creator buys supplies, equips a bag, travels to Checkpoint, searches weapon containers, and later returns to the stash with guns. It is a useful example of an acquisition route, rather than a promise of guaranteed drops.
Press M before committing to the route. A backpack full of weapons needs an exit whose requirements fit the loadout; Storm Drain’s no-backpack condition can make another exit more suitable.
Police armory: a sample route, not a guaranteed jackpot
The October13 police-armory video shows weapon crates, a safe and lockers inside the Police building’s barred room. Reviewed samples include lights, sights, suppressors, jewelry, gold coins, a pager, melee weapons, bags and rigs. Contents differ between the sampled containers.
When asked where the police keys came from, the uploader replied that they bought them from Scrapper. Check the trader’s current key stock and the lock’s own label before buying. The video title describes Nightmare and 20 openings; these sampled frames do not establish drop probabilities.
The uploader preferred Airfield loot in their end card and suggested Armory, Command HQ, Checkpoint and Crash Site in a reply. Treat this as their route recommendation, not a measured return-per-hour comparison.
Grid actions visible in the UI
| Action | Visible input hint |
|---|---|
| Rotate an item | R while dragging |
| Open item options | Right-click |
| Move an item | Ctrl + click |
| Equip or use | Double-click |
| Close inventory | Tab |
What to carry and what to leave
- A quiet melee option fits the developer’s sound-based survival rule.
- Take medical supplies that match the conditions you need to handle.
- Keep a flare or reserve boat cash when your chosen exit needs it.
- Leave valuables in your stash when you do not need them on the raid. Secure-case contents are the explicit death-protection exception.
- Compare grid space and compatible ammunition before taking an expensive weapon. This guide does not assign unsupported weapon tiers.
Sources
- Roblox Games API — HUSH public game record
Official game identity and description, reviewed 16 October 2026. Supports the stated PvE, squad, raid, sound and secure-case rules.
- VendoPlus — How to Play Hush Zombie Extraction Roblox Full Guide
Published 13 October 2026; reviewed 16 October. Gameplay and automatic captions inform the first-raid, inventory, medical and extraction instructions.
- VendoPlus — How to Get Every Item and Weapon in HUSH Zombie Extraction Roblox Full Tutorial
Published 15 October 2026; reviewed 16 October. The recorded purchase, equip, map, loot and return sequence is an example rather than a promise of drops.
- Aucune idée Canard — I Opened 20 police armory on nightmare so that you don’t waste time
Published 13 October 2026; reviewed 16 October. The uploader’s replies identify Scrapper as their key source and explain selling; sampled openings do not establish probabilities.